Accessing LUKS and ext4 drives from macOS
January 13, 2026
Recently I needed to access my LUKS-encrypted, ext4 drives from a MacBook. This can come in handy in a few situations — future-proofing backups, needing to access Linux drives in a pinch while the NAS is down, etc — so here’s a quick playbook for my future self and others in the same position!
Overview
Unfortunately ext4 and LUKS are not supported natively by macOS so accessing the data from a Mac requires extra tooling. I’ve aimed for a lightweight and minimal, mostly stateless solution; this in turn should make it reliable and future-proof (I’ll report back in ten years from now). To minimize the risk of bit-rot, the only dependency beyond stock macOS is (the amazing) QEMU.
In the next section I’ll outline the solution, then walk through the actual playbook I use when accessing those pesky Linux drives from a Mac. In the final section we’ll wrap up by looking at some issues with the playbook and possible improvements. Let’s go!
Architecture
The solution works by spinning up a virtual machine (VM) running a minimal Ubuntu image. The VM is created using QEMU, the lightweight CLI tool that also powers Docker Desktop and Podman Desktop on macOS. Because the external drive is passed raw to the VM and because QEMU supports Apple’s Hypervisor Framework for hardware acceleration, the VM runs smoothly and the drive’s data can be accessed efficiently.
The Ubuntu system is set up using cloud-init, which is a collection of tools and interfaces more often used by cloud services like AWS to set up new machines and instances automatically, which makes this setup — and in particular the SSH config — automated and reproducible. SSH is used both for accessing the Ubuntu system (to e.g. decrypt the LUKS partition) and to transfer the files between the VM and macOS.
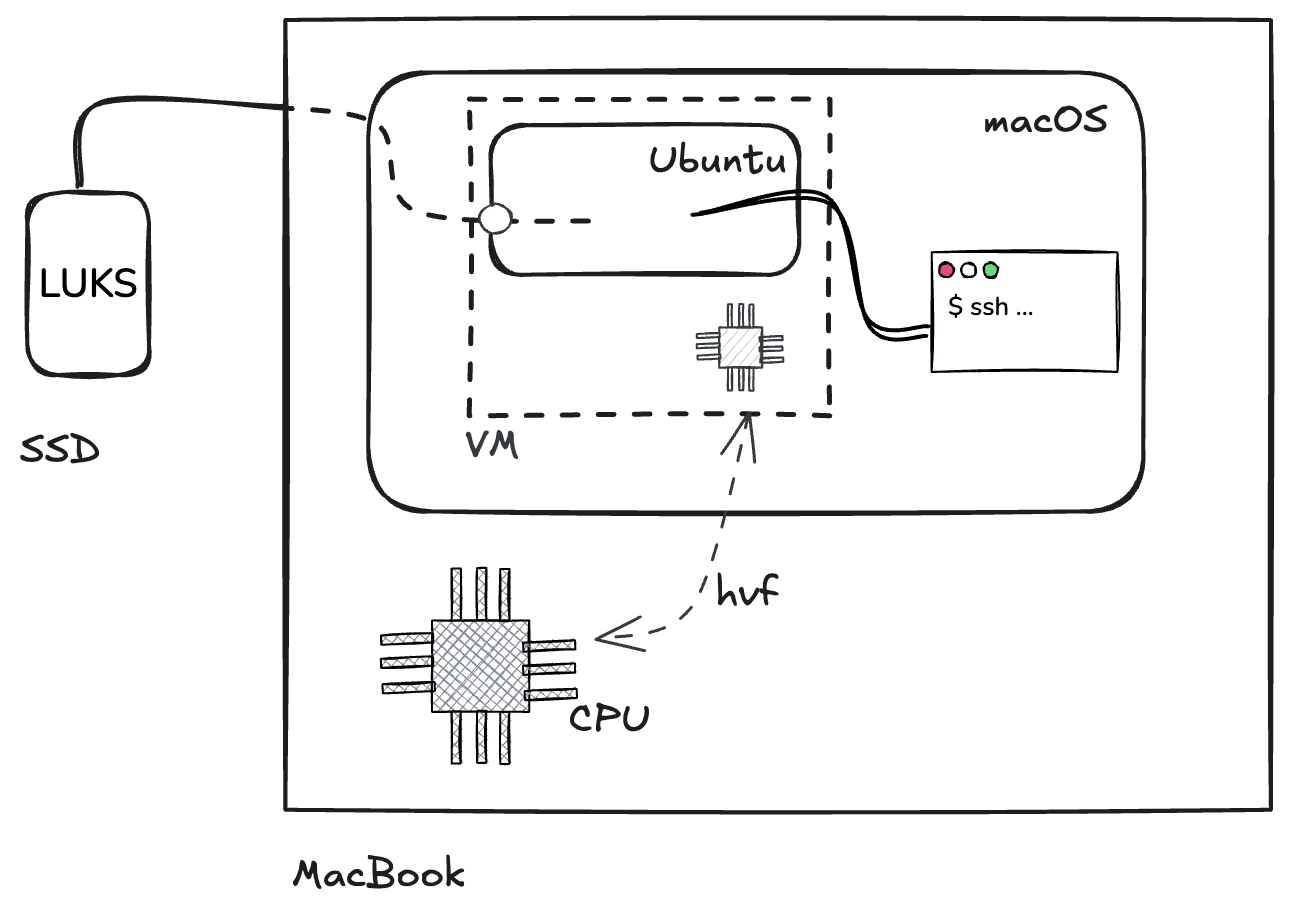
To recap, the external drive is connected to the MacBook but the content is not directly accessed from macOS; instead the drive is passed through to an Ubuntu VM created with QEMU. The Ubuntu system is configured with cloud-init to allow SSH access from the macOS host, for terminal access (for LUKS and mount operations) and then also for transferring files. Note that macOS never mounts or interprets the encrypted filesystem; all LUKS and ext4 handling happens inside the VM.
Let’s now see how the VM is set up and how the files can be transferred!
Playbook
We need to prepare a few images required by the VM to boot. We’ll be downloading and creating a few files, so it’s best to move to an empty directory:
cd $(mktemp -d)Download the official Ubuntu image:
curl -LO https://cloud-images.ubuntu.com/noble/current/noble-server-cloudimg-arm64.imgNoteYou can also pin an old (specific) image by date. In my experience however using the latest (
current) image is the most reliable: the tools we use from Ubuntu (SSH,LUKS) don’t (or very rarely) change interface, but old Ubuntu images are not stored indefinitely by Canonical.
Create the cloud-init data:
mkdir -p ./cloud-init
cat << EOF > ./cloud-init/user-data
#cloud-config
chpasswd:
  expire: False
ssh_pwauth: False
ssh_authorized_keys:
$(cat ~/.ssh/*.pub | sed 's/^/  - /')
EOF

cat << EOF > ./cloud-init/meta-data
instance-id: my-network/my-vm
EOF
All cloud-init configuration is done with YAML. The first file, ./cloud-init/user-data, sets up a single user and disables password authentication, only allowing SSH access. The public key(s) are read from the host (i.e. Macbook Air). The value in ./cloud-init/meta-data is required for cloud-init to run successfully though the specific content does not matter much (see the cloudinit reference for more information).
For Ubuntu to correctly recognize the cloud-init data, it needs to be mounted as a CD-ROM with volume name cidata.
Create an ISO image with volume name cidata with content from ./cloud-init, using the macOS tool hdiutil:
hdiutil makehybrid -iso -joliet -default-volume-name cidata -o ./seed.iso ./cloud-initNow we need QEMU. I use Nix to install QEMU from nixpkgs, as it allows an ephemeral install without polluting the system.
Install QEMU from nixpkgs:
nix build nixpkgs#qemu
PATH="$PWD/result/bin:$PATH"
QEMU="$PWD/result/share/qemu"
qemu-system-aarch64 --version
Note
QEMUcan also be installed withbrew, see https://www.qemu.org/download/#macos.
Ubuntu needs some firmware to boot under UEFI on Apple Silicon. Said firmware should be shipped as part of the QEMU install.
Locate the aarch64 firmware in the QEMU install:
ls "$QEMU/edk2-aarch64-code.fd" # this file should existThe boot process also requires an additional, blank 64MB drive. Use the qemu-img tool from QEMU to create a sparse empty image:
qemu-img create -f qcow2 varstore.img 64MAt this point we have the OS image ready, the cloud-init “CD-ROM” image, as well as two boot-related images. All these will be connected to the VM; now let’s actually set up the physical (external drive).
Connect the external drive to the MacBook and when prompted tell macOS to ignore it:
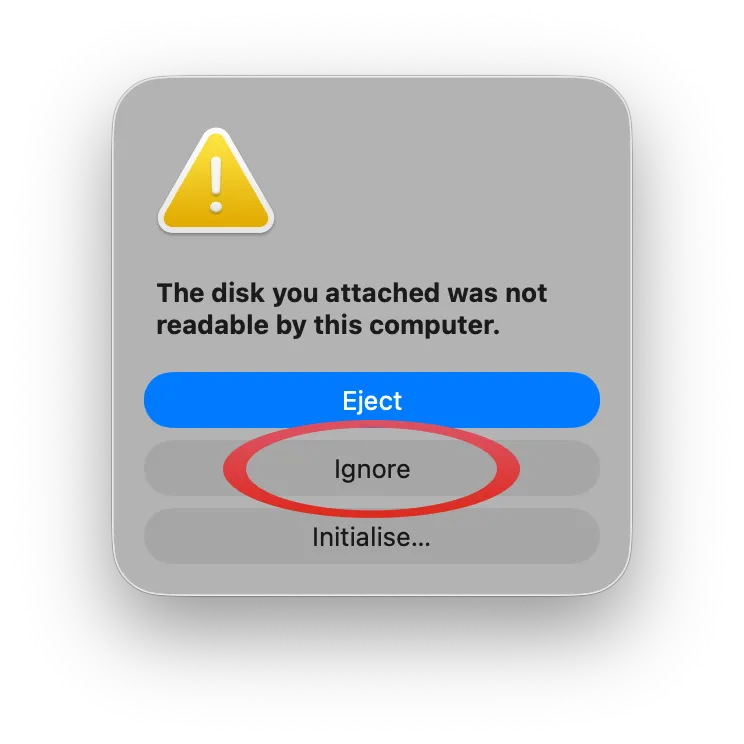
WarningFrom here on, do not plug or unplug any disks. Whenever a new disk is plugged in, macOS rescans all the disks and might attempt to mount
/dev/disk4again which will wreak havoc in the VM.
We need to identify the disk number macOS assigned to the external drive.
Use diskutil list and look for a drive labeled as external, physical, which has a partition of type Linux and a SIZE that matches the drive’s:
$ diskutil list
/dev/disk0 (internal, physical):
   #:                       TYPE NAME                    SIZE       IDENTIFIER
   0:      GUID_partition_scheme                        *251.0 GB   disk0
   ...

/dev/disk3 (synthesized):
   #:                       TYPE NAME                    SIZE       IDENTIFIER
   0:      APFS Container Scheme -                      +245.1 GB   disk3
                                 Physical Store disk0s2
   1:                APFS Volume Macintosh HD            12.2 GB    disk3s1
   ...

/dev/disk4 (external, physical):
   #:                       TYPE NAME                    SIZE       IDENTIFIER
   0:     FDisk_partition_scheme                        *2.0 TB     disk4
   1:                      Linux                         2.0 TB     disk4s1

...WarningIn the next two commands replace
disk4with your disk. Passing in the wrong disk might incur unexpected data loss, I’m not responsible for you erasing your data in any way, etc, etc. Enjoy responsibly.
Unmount the drive:
diskutil unmountDisk /dev/disk4Starting the VM
Start the Ubuntu VM with the external drive:
NoteNote the use of
/dev/rdisk4(instead of/dev/disk4) so that the disk is passed through “raw”. This gives Ubuntu direct control over the disk, withoutQEMUor macOS interfering.
sudo qemu-system-aarch64 \
  -cpu host -M virt,accel=hvf -m 2G \
  -drive file="$QEMU/edk2-aarch64-code.fd",if=pflash,format=raw,readonly=on \
  -drive file=varstore.img,if=pflash \
  -drive file=./noble-server-cloudimg-arm64.img,format=qcow2,if=virtio \
  -drive file=seed.iso,index=1,media=cdrom \
  -drive file=/dev/rdisk4,if=virtio,format=raw,cache=none \
  -nographic -nic user,hostfwd=tcp:127.0.0.1:2222-:22
This creates a VM with 2 GB of RAM (-m 2G) and specifies the CPU as host using Apple’s Hypervisor Framework (hvf) to avoid software CPU emulation.
Five -drives are attached to the machine:
- The first two are necessary for Ubuntu to boot correctly. Those are attached as flash (
if=pflash) and use theaarch64firmware from theQEMUinstall as well as thevarstoreimage we created earlier. - The third drive is the Ubuntu image. This is effectively the (writable) OS filesystem that will be booted from. Once booted, Ubuntu will see this drive much like it would an internal SSD.
- The fourth drive is the image we baked from
./cloud-initand its YAML. Ubuntu will see it as a CD-ROM and recognize it as cloud-init data and use it to set up the default userubuntu. - The fifth and final drive is the external,
LUKS-encrypted drive, passed through. Ubuntu will see this as an external drive.
We do also map the VM’s SSH port (22) to a free port on the macOS host (here 2222) so that we can connect to the VM via SSH.
After a few seconds the VM is up and running and accessible via SSH. For more information on QEMU’s CLI options refer to the official documentation.
Decrypting and accessing the drive
SSH into the VM:
# from macOS
SSH_CMD='ssh -o StrictHostKeyChecking=no -o UserKnownHostsFile=/dev/null -p 2222'
eval "$SSH_CMD ubuntu@localhost"
It’s handy to keep the SSH command in a variable so it can be reused with other commands like rsync. Host key checking is disabled because I spin up a new VM every time.
Now identify the relevant partition inside the VM:
ubuntu@ubuntu:~$ sudo lsblk
NAME    MAJ:MIN RM  SIZE RO TYPE MOUNTPOINTS
vda     253:0    0  3.5G  0 disk
├─vda1  253:1    0  2.5G  0 part /
├─vda15 253:15   0   99M  0 part /boot/efi
└─vda16 259:0    0  923M  0 part /boot
vdb     253:16   0  900K  1 disk
vdc     253:32   0  1.8T  0 disk
└─vdc1  253:33   0  1.8T  0 part
Decrypt and mount the partition:
# from Linux VM via SSH
sudo cryptsetup luksOpen /dev/vdc1 ext-drive # will ask for device passphrase
sudo mkdir -p /mnt/ext-drive
sudo mount /dev/mapper/ext-drive /mnt/ext-drive
The decrypted drive content is accessible!
Transfer content between the VM and macOS using rsync:
# from macOS
rsync --archive --verbose --human-readable --progress \
    --rsh "$SSH_CMD" \
    ./my-new-backup/ ubuntu@localhost:/mnt/ext-drive/my-backup-v42
The first argument turns on archive mode so that files are copied recursively. We also enable verbose, human readable output, as well as progress reporting. The --rsh argument specifies a custom SSH command to use; if you followed along then $SSH_CMD should contain the ssh command with port. The last two arguments specify what to copy where; in general rsync src/ dest will copy every file from src/ into dest, such that src/foo becomes dest/foo (same as cp)
Once we’re done copying or playing with the files, we can umount the drive, close it from a LUKS point of view, and power off the VM:
# from Linux VM via SSH
sudo umount /mnt/ext-drive
sudo cryptsetup close ext-drive
sudo poweroff
Finally, we can turn off the drive from macOS:
# from macOS
diskutil eject /dev/disk4
Wrapping up
That’s it for the playbook!
While this works pretty well in practice, there are a few things that could be improved. For instance, it would be nice to have somewhat more native integration with Finder — this could be done with sshfs (somewhat deprecated as I understand) or by setting up Samba from within Ubuntu and connecting to it from Finder.
There’s also the issue that, as it is now, it’s a bunch of commands you have to get right; get one wrong and you might wipe your system or backups. I like running them manually so that I can double check everything before hitting enter, but over time I might start porting them to a small script, or even better a full-blown app (I’ve been looking for an excuse to try Tauri for a while).
For now, I’ll stick to the playbook. Feel free to use it and tweak it — at your own risk of course!
Let me know if you enjoyed this article! You can also subscribe to receive updates.
Here's more on the topic of LUKS and Linux: