How to Secure PrusaLink (or any Raspberry Pi web service) with HTTPS
February 17, 2025

Without HTTPS, credentials like Basic Auth are ineffective for security as they can be intercepted by any device on the network. This guide explains how to set up HTTPS for a Raspberry Pi using Let’s Encrypt and nginx, with PrusaLink as an example. This setup works without exposing the Raspberry Pi to the internet.
NotePrusaLink is a web-based interface for remotely managing Prusa 3D printers, and it runs (or can run) on a Raspberry Pi using Raspberry Pi OS. By default, PrusaLink hosts a web server on port 8080 (and forwards traffic from the default HTTP port 80 to port 8080), allowing users to connect to their printer from a browser. However, out-of-the-box, this connection is unencrypted, making it vulnerable to network snooping. This guide walks you through setting up secure HTTPS access using Let’s Encrypt certificates and nginx as a reverse proxy. While this tutorial focuses on PrusaLink, the same approach applies to any Raspberry Pi setup running a web service on a custom port (e.g., OctoPrint, Home Assistant, or other self-hosted applications).
We’ll start by checking some security settings (firewall, SSH config). Then we’ll install Let’s Encrypt’s automated certificate manager certbot, which will take care of generating and renewing certificates. Then we’ll set up nginx and will instruct it to use the Let’s Encrypt certificates to enable HTTPS connections to the Pi. Finally we’ll tweak some settings specific to PrusaLink.
Connecting to the Raspberry Pi
Before we can do anything it’s important to ensure that we can
- reach the Raspberry Pi over the network and
- ensure we can log into the Pi (whether via SSH or a connected keyboard).
Reaching the host
The usual way to connect to a Raspberry Pi is using a .local domain on your network. This should work out of the box on Raspberry Pi OS (and derivatives like the PrusaLink OS image) if you correctly specified the credentials for your wireless network and set a hostname:
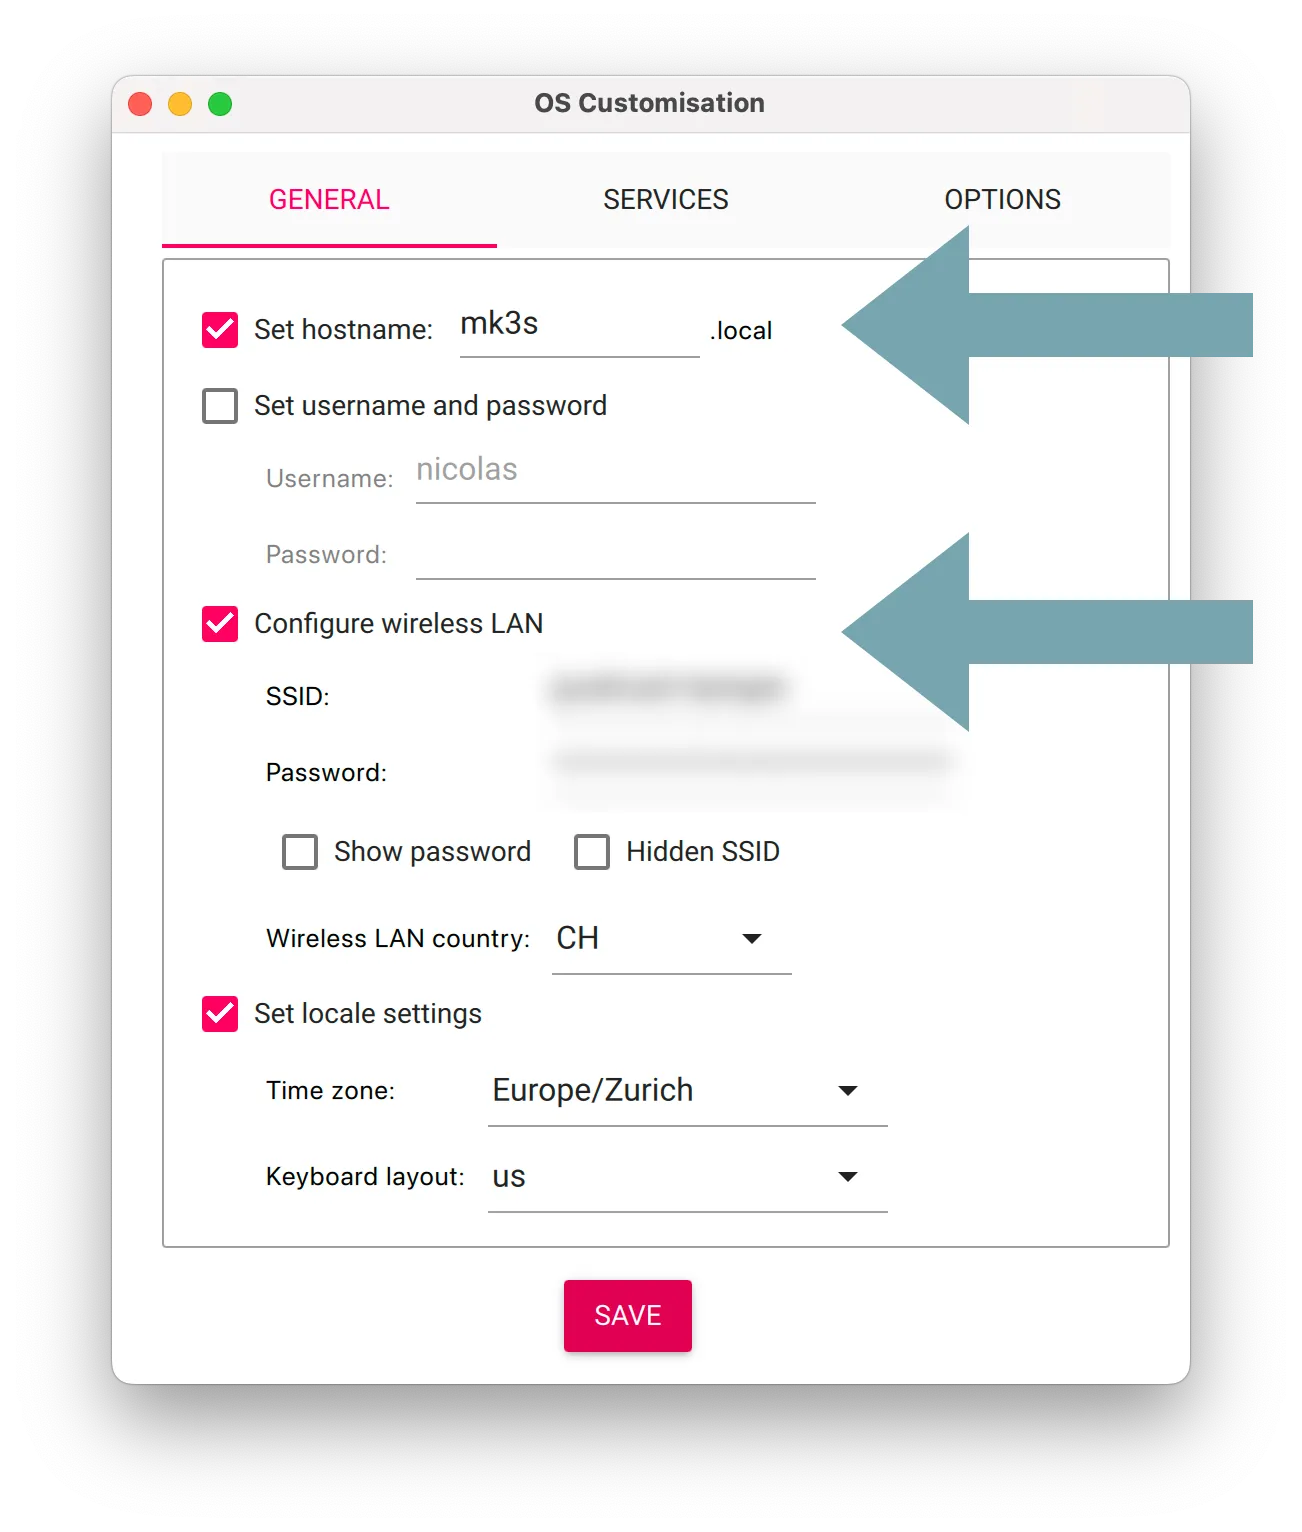
In this case I set the hostname to mk3s because this PrusaLink instance is connected to a Prusa mk3s. At this point I can connect to PrusaLink (or any other webserver running on the Pi) using <hostname>.local, or mk3s.local in my case.
When the client (curl or your browser) sees a .local address it sends a query to a known “broadcast” address on your router. The router will forward the query to all the devices on your network. The query mentions the “address” we’re trying to reach (mk3s.local in this case) and, if any of the devices recognize themselves, they can reply with their own IP address (192.168.0.42, for instance).
This is not particularly safe because any device on the network can reply and pretend to be another device; we’ll deal with this later via DNS and SSL certificates. Either way, for now make sure you can reach <hostname>.local from e.g. your browser or with curl.
Optional: SSH access
NoteIt’s possible to use SSH to connect to the Pi but — since we’ll be tweaking network settings — it’s a good idea to have a USB keyboard and a monitor handy in case something goes wrong.
If you want to log in via SSH, the easiest way is to include your public (.pub) SSH key when flashing the Raspberry Pi (your private SSH key, the one without a .pub extension, should never leave your computer). The public key can be added to the Raspberry Pi from the OS configurator. If you use GitHub, you may already have an SSH key. Check at: https://github.com/<username>.keys.
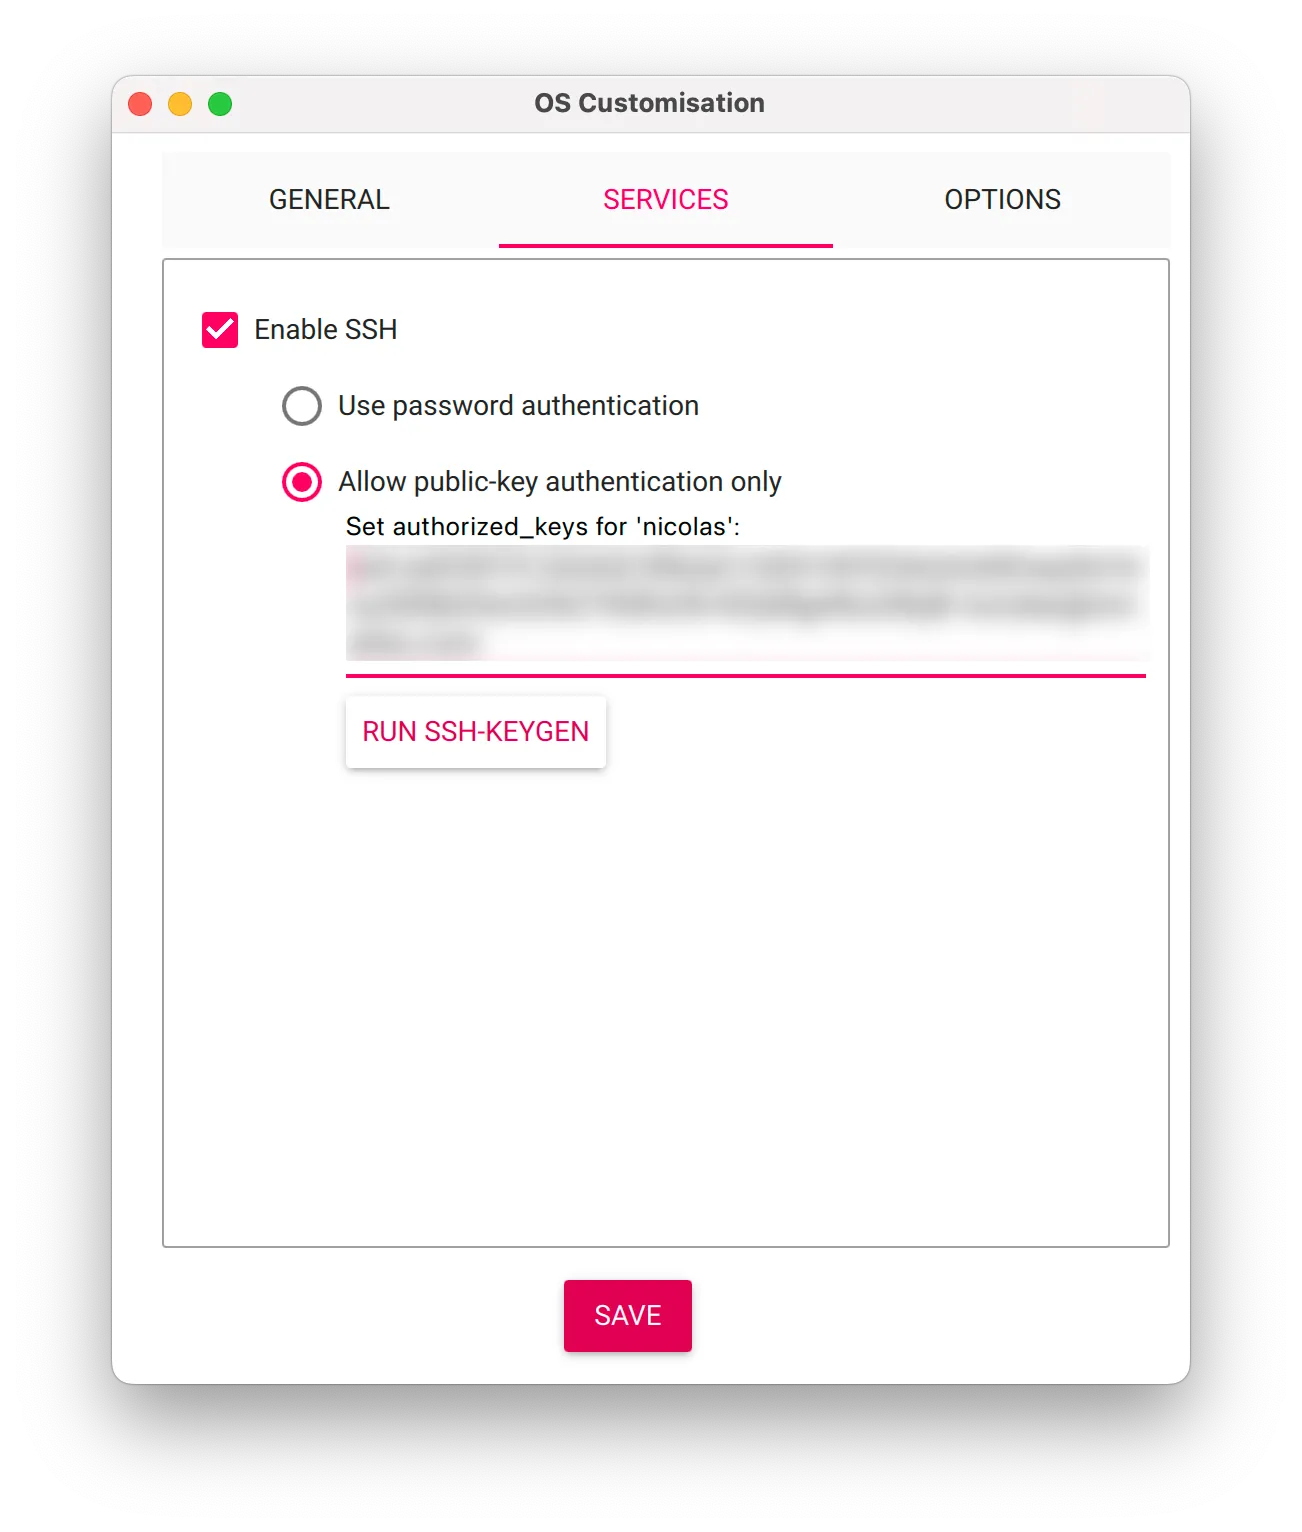
Note that anyone with the associated private key will have full access to your Raspberry Pi. Keep it private on your (non-Raspberry Pi) computer.
Logging into the Raspberry Pi
The next step is to ensure we can get terminal access to the Raspberry Pi, be it via SSH or with a keyboard connected to the Raspberry Pi. This will allow us to actually configure the Raspberry Pi.
If you are using ssh, run this command:
ssh <username>@<hostname>.localIf you’re using a keyboard, you’ll be prompted to enter a username and password.
The username and password will vary depending on the OS flavor you are using: for PrusaLink, the username is jo and the password is raspberry. For Raspberry Pi OS, the username is pi and the password is raspberry.
NoteIt’s generally unsafe to allow SSH login with username and password. In the next section we’ll see how to ensure this is not enabled on your Raspberry Pi.
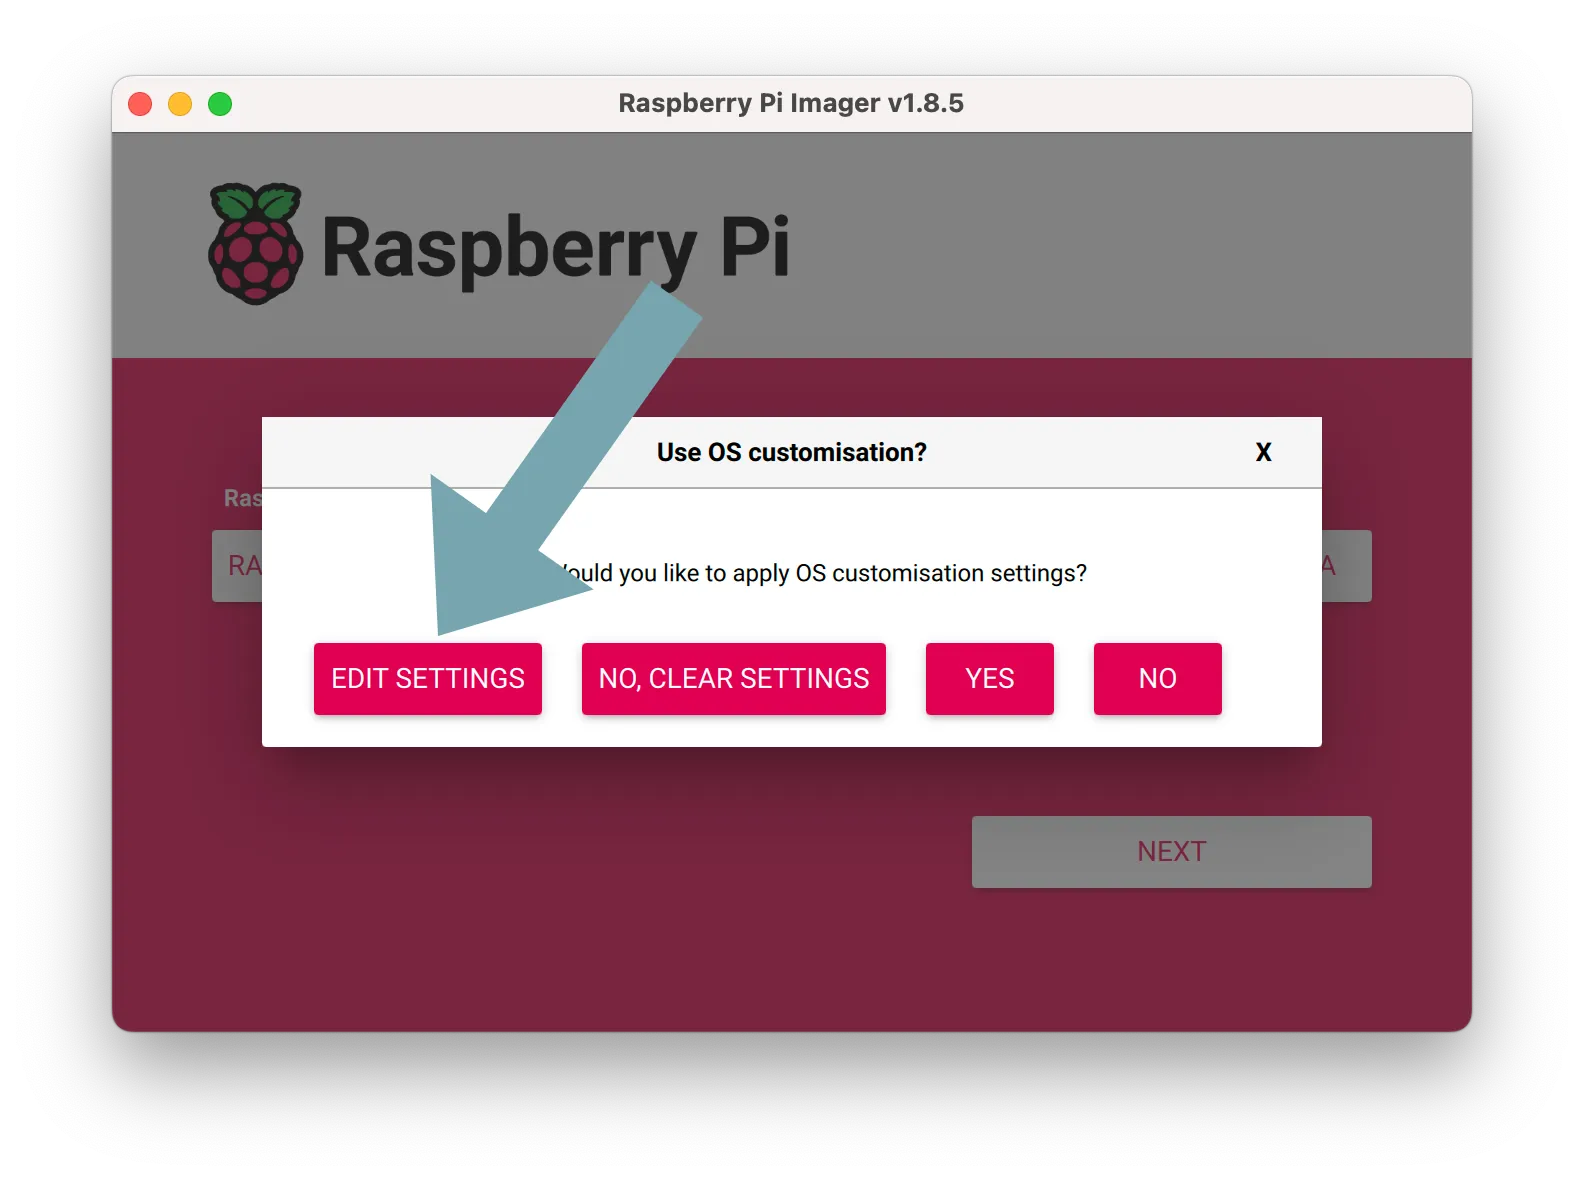
Regardless of whether you use SSH or connect to the machine physically, you should see a screen like this:
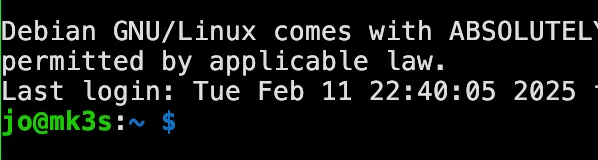
Congrats! You’re in. Now, let’s secure the machine.
Securing the SSH daemon settings
SSH provides remote access to your Raspberry Pi, but default settings can be insecure. To improve security we’ll prevent anyone from logging in directly as root via SSH (sudo will still work though) and disable password authentication (to only allow authenticating via key).
On the Raspberry Pi, edit the SSH daemon config file:
sudo nano /etc/ssh/sshd_configNoteCheck
/etc/ssh/sshd_config.d/to ensure no other settings override your changes.
and find and modify (or add) these lines (if they exist and are commented out, remove the leading # character):
PermitRootLogin no
PasswordAuthentication no
This prevents root logins and disables password authentication, forcing the use of SSH keys.
Now apply the changes:
sudo systemctl reload sshd.serviceVerify the active configuration:
sudo sshd -TWith SSH secured, you can now safely access your Raspberry Pi without passwords or unnecessary exposure!
Locking down the Raspberry Pi with ufw, the Uncomplicated FireWall.
Cool kids nowadays use the Uncomplicated Firewall. The Uncomplicated Firewall — or ufw — is a user-friendly tool for managing firewall rules on Linux systems, simplifying the complex iptables configurations. Setting up iptables rules by hand can be a bit tricky.
In this guide, we’ll configure UFW to permit essential services like SSH, HTTP, and HTTPS while blocking unwanted traffic to enhance the security of your Raspberry Pi.
To install it on your Raspberry Pi, run the following command:
sudo apt install ufwLet’s start by explicitly allowing all outgoing traffic (we don’t want to block requests initiated from the Raspberry Pi)
sudo ufw default allow outgoingThe idea is to eventually deny incoming traffic by default. This means no SSH, no HTTP access (for e.g. the PrusaLink webpage). At this stage, even <hostname>.local may stop resolving, as mDNS queries (the address lookup using broadcast) will also be blocked by the firewall. So before we disable all incoming traffic by default, let’s allow specific incoming traffic for SSH, HTTP and also mDNS:
sudo ufw allow 22/tcp # for SSH, equivalent to 'ufw allow SSH'
sudo ufw allow 80/tcp # allow unencrypted HTTP traffic
sudo ufw allow 5353/udp # allow UDP traffic on port 5353, used for mDNS
And now, we can tell ufw to block all other (unexpected) incoming traffic (in a minute we’ll re-open port 443 for HTTPS, though):
sudo ufw default deny incomingAt this point it’s a good idea to ensure that <hostname>.local still takes you to the machine, that you can still load a webpage served by the Raspberry Pi if any (like PrusaLink) and that you can still SSH into the machine. For now (and until HTTPS is set up) we’re done with the firewall!
Setting Up a Domain name for Your Raspberry Pi
By default, you can access your Raspberry Pi using <hostname>.local (like mk3s.local), but Let’s Encrypt requires a fully qualified domain name (FQDN) to issue an SSL certificate.
In my case I’ll use mk3s.homelette.xyz. Your Raspberry Pi does not need to be accessible from outside your local (home) network, though you do need to at least set up a local DNS.
How you do this will vary depending on what you need, what you have and what you’re comfortable with tweaking. Often, you can let your router resolve domain names to IP addresses. If your Raspberry Pi has an IP address 192.168.0.42 then you can tell your router to resolve mk3s.homelette.xyz (replace with your own domain) to 192.168.0.42. If you do not have a domain name yet, I recommend you use Cloudflare as the SSL certificate instructions later target Cloudflare (though with a bit of research should work with any registrar).
NoteWe won’t actually make the (Cloudflare) DNS point to the local IP of the Raspberry Pi. The DNS servers will only contain a text challenge necessary for creating the SSL certificate. More on this in the next section.
Once the local resolution is set up (with a domain name that you own so that later we can generate an SSL certificate), confirm it works:
curl -I http://mk3s.homelette.xyzIf you see a response, your DNS is working! Good luck.
NoteIf everything works using your domain name you can disable the
mDNStraffic used for.localdiscovery withsudo ufw deny 5353/udp
Setting up SSL certificates with Let’s Encrypt
Without SSL certificates, all data between your Raspberry Pi and connected devices is sent in plain text, meaning any device on your network (partner’s laptop, smart watch, smart sensor, smart fridge) can see all your traffic (also known as “packet sniffing”). This makes the idea of using credentials for PrusaLink somewhat moot, since the credentials themselves can be seen from any other connected device.
Let’s Encrypt offers free SSL certificates, allowing you to encrypt traffic without requiring manual certificate installation on every device. We’ll use Certbot to automatically generate and renew certificates, securing your connection.
First, we’ll install certbot, Let’s Encrypt’s bot for generating and renewing certificates. The way we’ll set things up, the bot will generate a private certificate that will never leave your Raspberry Pi. Then, it will ping the Let’s Encrypt servers, which will ask certbot to prove that whatever domain you’re using (mk3s.homelette.xyz in my case) belongs to you.
Let’s Encrypt will do so by using a “DNS challenge”: it sends a string of characters to certbot on your Raspberry Pi which certbot is responsible for somehow displaying in a DNS record. We will give certbot an API key so that it can connect to the registrar from which you bought the domain name and create DNS records. We’ll be using Cloudflare as a registrar though certbot supports many others).
NoteSome domain registrars do not support automated DNS updates via API, which means
certbotwon’t be able to update your DNS records automatically. If this is the case, you’ll need to manually create a TXT record in your domain’s DNS settings whenevercertbotrequests validation. Check your registrar’s documentation for DNS record management, or consider switching to a provider like Cloudflare, which supports API-based DNS challenges.
Let’s Encrypt will check the (public) DNS records on your domain and once it sees the string appear there, it will create a new chain of certificates from their own root certificate which (in other words) means your own private certificate gets whitelisted on browsers across the world (details are interesting but unimportant here).
NoteThere is an alternative to the “DNS challenge” mentioned above, which is the “HTTP challenge” where Let’s Encrypt’s servers connect directly to the
certbotinstance on your machine. We do not do this here because this would require your Raspberry Pi to be accessible from the outside of your local network.
Once Let’s Encrypt has verified that you own the domain via the challenge, certbot will keep renewing certificates automatically, and you will be able to connect to your Raspberry Pi (once we re-open the HTTPS port) using https://<your domain> from any device on your network.
Setting up certbot
Here we’ll simply follow the (very nice) docs for certbot. First, let’s install the certbot executable:
sudo apt install snapd # if not installed already
sudo snap install --classic certbot
sudo ln -s /snap/bin/certbot /usr/bin/certbot
then we can install the certbot Cloudflare plugin, which certbot will use to talk to Cloudflare (here YMMV depending on your domain provider, see the list of supported providers for more info):
sudo snap set certbot trust-plugin-with-root=ok # needed for installing the plugin
sudo snap install certbot-dns-cloudflare
sudo ln -s /snap/bin/certbot-dns-cloudflare /usr/bin/certbot-dns-cloudflare
At this point certbot and its companion Cloudflare plugin are installed. We will now write the credentials for Cloudflare so that certbot can update your domain’s DNS record (see the plugin’s docs for more info). For this, create a new file on your Raspberry Pi from the console, using your editor of choice, and set the correct permissions (the plugin might complain otherwise):
nano cloudflare.iniand add the following content, adapted for your own Cloudflare API Token:
# Cloudflare API token used by Certbot
dns_cloudflare_api_token = 0123456789abcdef0123456789abcdef01234567
Finally set somewhat restrictive permissions to make the certbot plugin happy:
chmod 0600 cloudflare.iniAnd we’re almost done, now Let There Be Light!
sudo certbot certonly \
    --dns-cloudflare --dns-cloudflare-credentials ./cloudflare.ini \
    -d mk3s.homelette.xyz # replace with your own domain
You should see something like this:
... Successfully received certificate.
... Certbot has set up a scheduled task to ...NoteLater on we’ll be setting up
nginxas a reverse proxy. You might see thatcertbothas annginxplugin though this plugin is only relevant for Let’s Encrypt’s “HTTP” challenge, where Let’s Encrypt’s machines can connect to nginx and verify the domain. Here we use the “DNS challenge” and thenginxplugin forcertbotis not relevant for our use ofnginxas a reverse proxy.
You only need to run the certbot command once; from now on certbot will take care of generating and renewing certificates. Your certificates will be ready in a minute or so, and in the next section we’ll figure out how to use them:
sudo ls /etc/letsencrypt/live/mk3s.homelette.xyz/*
... certificate stuff
If you want to err on the safe side however, you can verify that certbot will be able to renew your certificates in the future by running the following command now:
sudo certbot renew --dry-runSetting up HTTPS using the new certificates
In order to route HTTPS traffic from the outside to PrusaLink (this is called “SSL termination”) we’ll use the venerable nginx:
sudo apt install nginxDon’t worry if you’ve never used nginx (or any other reverse proxy), we’ll stick to very basic config. Let’s create a new “server” (meaning, routing config) in /etc/nginx/sites-available/mk3s.homelette.xyz (replace mk3s.homelette.xyz with your domain name, though the actual filename doesn’t really matter). Here is the config we’ll use (again, replace with your domain in the paths to the certificates):
server {
    listen 443 default_server ssl;
    ssl_certificate /etc/letsencrypt/live/mk3s.homelette.xyz/fullchain.pem;
    ssl_certificate_key /etc/letsencrypt/live/mk3s.homelette.xyz/privkey.pem;
    server_name mk3s.homelette.xyz;
    location / {
        proxy_pass http://localhost:8080; # The PrusaLink server runs on port 8080
    }
}
Now we can tell nginx to use that config:
sudo rm /etc/nginx/sites-enabled/default # remove existing symlink if present
sudo ln -s /etc/nginx/sites-available/mk3s.homelette.xyz /etc/nginx/sites-enabled/default
sudo systemctl reload nginx # notify nginx of the config change
At this point, you can try to reach PrusaLink at e.g. https://mk3s.homelette.xyz — though you’ll probably get an error because we asked the firewall to block all incoming traffic by default. In order to re-open access for HTTPS traffic, we’ll need to allow incoming traffic on port 443:
sudo ufw allow 443/tcpAnd now it should work! Try pointing your browser at https://mk3s.homelette.xyz (replace with your domain, and note the s in https).
Reloading the nginx configuration
While certbot will renew your certificate automatically, nginx may continue serving a cached version long past the expiration date. Fortunately for us, certbot has a concept of hooks that are run upon renewals.
Create a new hook that will be run after the certificate has been renewed:
sudo nano /etc/letsencrypt/renewal-hooks/post/reload-nginxThis is a script that will be executed by certbot. We only need a single command to have nginx reload the certificate:
#!/usr/bin/env bash

systemctl reload nginx
After this, make the script executable:
sudo chmod +x /etc/letsencrypt/renewal-hooks/post/reload-nginxFrom now on, nginx will reload its configuration — including the certificate — whenever certbot renews the certificate.
Redirecting HTTP to HTTPS
When you use a client (like curl or your browser) to get a page via https://, the client will under the hood try to reach the server on port 443. When using http:// (no s) the client will try to reach the server on port 80. At this point your Raspberry Pi might be serving PrusaLink on port 80 as well as on port 443. Ideally we don’t want to allow traffic to PrusaLink through port 80, so we’ll instruct nginx to redirect any http:// traffic (on port 80) to use https:// instead.
Luckily it doesn’t take much to do so. Add a new server block in the nginx config (add this above the server { } block we wrote earlier):
# /etc/nginx/sites-available/mk3s.homelette.xyz, replace with your own domain name
server {
  listen 80;
  server_name mk3s.homelette.xyz;

  # Redirect all HTTP traffic to HTTPS
  return 301 https://$host$request_uri;
}

# server definition from earlier
server { ... }
In an ideal world, and in most cases, that’s all you’d need. In the case of PrusaLink however — and at the time of writing — there’s one extra step necessary.
For reasons that I don’t really want to understand, the PrusaLink Raspberry Pi OS will instruct iptables to route all traffic on port 80 to port 8080 (8080 is the port where the PrusaLink webserver is running, and iptables is a sort of low-level firewall/router).
You can check if this is the case for you by opening /etc/rc.local on your PrusaLink Raspberry Pi:
$ cat /etc/rc.local

...
# Forward the port 80 to 8080 even on the loopback, so we can ping ourselves
iptables -t nat -A PREROUTING -i wlan0 -p tcp --dport 80 -j REDIRECT --to-port 8080
iptables -t nat -A PREROUTING -i eth0 -p tcp --dport 80 -j REDIRECT --to-port 8080
iptables -t nat -I OUTPUT -p tcp -o lo -d localhost --dport 80 -j REDIRECT --to-ports 8080
...
There’s no need to get into details but those three lines do the following:
- route all external wireless/WLAN/WiFi tcp traffic on port
80(i.e. unencrypted HTTP traffic) to the PrusaLink server - route all external wired/ethernet tcp traffic on port
80(i.e. unencrypted HTTP traffic) to the PrusaLink server - route all internal tcp traffic on port
80(i.e. unencrypted HTTP traffic) to the PrusaLink server
As far as I understand the third rule (routing internal traffic) is actually needed by the PrusaLink server (it tries to ping itself on port 80). The other two rules however (rerouting external traffic) are just getting in the way.
The best way to deal with them is to comment them out. Those iptables rules are not persisted; instead they are simply set up when the /etc/rc.local is run (on boot). By commenting them out, they will simply never be set up. Open the /etc/rc.local file:
sudo nano /etc/rc.localand comment out the iptables lines that mention PREROUTING:
...
# comment out external routing to allow traffic to get to nginx
# by prefixing them with '#':

#iptables -t nat -A PREROUTING -i wlan0 -p tcp --dport 80 -j REDIRECT --to-port 8080
#iptables -t nat -A PREROUTING -i eth0 -p tcp --dport 80 -j REDIRECT --to-port 8080

# Forward the port 80 to 8080 on the loopback, so we can ping ourselves
iptables -t nat -I OUTPUT -p tcp -o lo -d localhost --dport 80 -j REDIRECT --to-ports 8080
...
Reboot your Raspberry Pi:
sudo rebootVerify HTTPS works:
- Open https://mk3s.homelette.xyz in your browser
- Check for the 🔒 secure lock icon
- Test HTTP to HTTPS redirection:
curl -I http://mk3s.homelette.xyzYou should see a 301 Moved Permanently response.
You now have encrypted traffic (including PrusaLink credentials) to your Raspberry Pi!
Nginx tweaks
If you use the PrusaLink REST interface to upload jobs to your printer (for instance by having set up a physical printer inside Prusaslicer) you might run into an error like this when uploading by prints: HTTP 413 Request Entity Too Large:
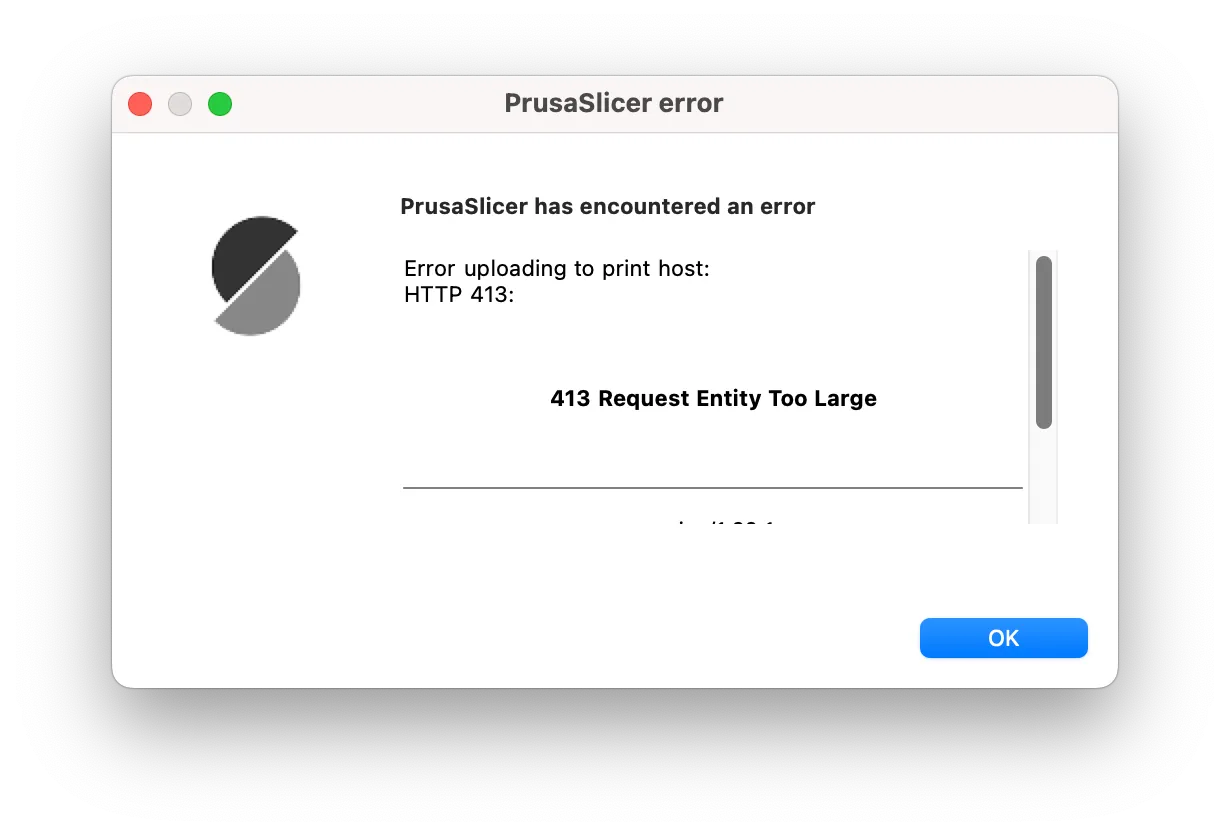
This is because, by default, nginx sets a max limit of 1 MB on the size of requests; anything bigger than that will get rejected and won’t even reach PrusaLink. So if the gcode generated by your slicer is 1MB+, you will get an error.
The workaround only takes one line. You need to specify client_max_body_size to the max size you want to allow for requests to PrusaLink. A limit of 100MB should be enough for most jobs, but setting it to 1GB (1g) would work just as well. You decide:
server {
  listen 443 ...;
  location / { proxy_pass ... }
  client_max_body_size 100m;
}
And now you should be able to send gcode of sliced big models (like the gorgeous moon city) through nginx as well!

Let me know or join the discussion if you enjoyed this article! You can also subscribe to receive updates.